Do you want the popular aesthetic of Roman Shades, but without spending $100+ on EACH window? These No-Sew Faux Roman Shades will do just that! They’ll give you the allure of Roman shades on a DIY budget- woohoo!
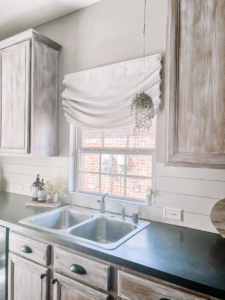
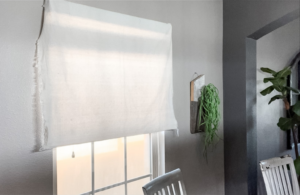
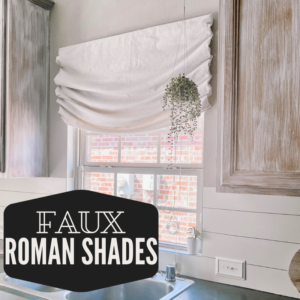
They’re referred to as faux roman shades since they are stationary. They perform like a valance, but provide the aesthetic of a pricey outside mount relaxed roman shade.
This is the EASIEST, QUICKEST, & MOST AFFORDABLE Faux Roman Shade tutorial. You only need to spend $20 for a drop cloth to get the charisma of expensive roman shades!
Here are all the details…
- Materials List for Inexpensive Faux Roman Shades
- Step by Step DIY for Faux Roman Shades
- Insider Look at Mistakes to Avoid
(Kitchen cabinets catching your eye? Here is how to white wash your kitchen cabinets: Updating Honey Oak Cabinets)
Materials List for Inexpensive Faux Roman Shades:
- 1″x3″ Wood cut to 3″ longer than the width of the window opening OR you can use the Crown Moulding over your Blinds
- Canvas drop cloth folded over (so it is doubled up & thus opaque). Cut it about 4″ wider than the width of the window. Cut the length so it hangs about 1/3 to 1/2 way down the window.
- Hot Glue/ Staple Gun/ or Small Nails to attach the drop cloth to the 1×3
- Stud Finder, Level & 3″ Nails to attach the 1×3 to the wall at the studs
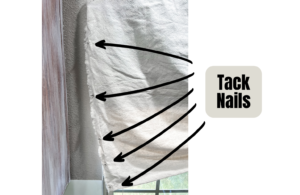
- 3/4″ Cut Tack Nails & your level to Pin the sides uniformly to the drywall
Step by Step DIY for Faux Roman Shades:
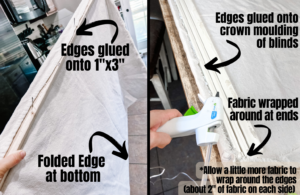
- First, attach the doubled drop cloth to either your wood moulding or the crown moulding of your current window blinds. I used hot glue to attach the drop cloth, but you could also staple or use tiny nails if you prefer. The raw edges will be at the top so that the bottom is folded. When you’re ready to attach- leave the same amount of extra fabric hanging over on each side of the header. and wrap that around the side of the header and glue down. Start attaching in the center and move to each side, not pulling too tight as you go, but not bunching the fabric up. When you get to the extra fabric at the ends wrap that around the back and glue that down as well.
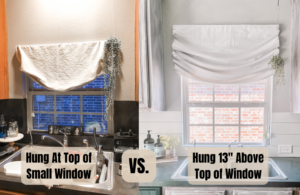
- If you are using the Crown Moulding of your blinds- attach the crown moulding (with the fabric attached) back onto the top of the blinds & move on to step 5. If you are using wood molding- you have the option of hanging your roman shade higher than the actual window to make the window appear taller. We exaggerated the height of the window over our kitchen sink by about a foot with this method. To determine the height of your roman shade, hang the fabric over the top of the 1×3 with the hot glue facing the wall & hold it up to the wall to make your decision.
- Mark that height, then make a line with your level where the wood moulding will hang. Use your stud finder to determine where the studs are & mark those spots along your line.
- Now it’s time to attach your wood moulding (with the fabric attached) to the wall. Have the fabric hang over the top of the wood moulding with the hot glue facing the wall. Then, lean in towards the wall, underneath the fabric & nail the 1×3 to the wall at the studs.
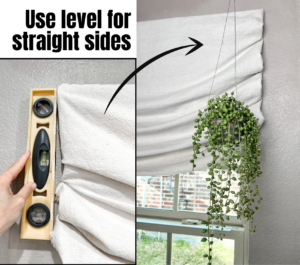
- Now that your moulding & fabric is hung its time to tack up the sides into pleats. To do this, first use your level to mark a vertical pencil line straight down from the edge of the 1×3. This is the line you will attach the edges of the fabric on, creating the pleats.
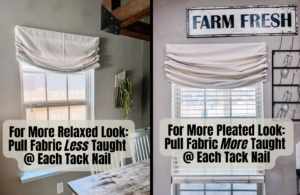
- Use Tack Nails to attach the sides of the roman shade to the drywall. Here is how: Put the tack nail into the fabric from the back forward a few inches down from the top and at the edge of the fabric. Pull the fabric, with the tack nail in it, up & tuck the edge under so that the point of the tack nail is now facing the wall. Push the tack nail into the wall on your vertical line with your thumb or a small hammer. (If your pleats aren’t tight enough the fabric will hang down in the middle instead of creating a nice pleat. If this happens-pull the fabric a bit more taught at each tack nail by putting the tack nail into the fabric a little farther in from the edge of the fabric.) Continue down each side of the window until you place your last tack nail at the bottom of the fabric. You can play around with how much fabric in between pleats and how tight to pull your fabric at each pleat to make your faux roman shades hang to your liking.
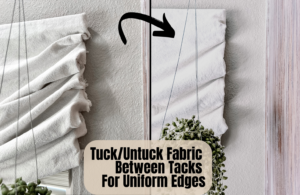
- Finally, when your shades are hung & the sides are tacked up, you can adjust the fabric on the side of each pleat until it is uniform all the way down. If it looks like the fabric goes in from your level vertical line, you can pull a little fabric out at each pleat. If it looks like the fabric is completely bunched out in between each nail, you can tuck it under until it is in line with the tacks.
Insider Look at Mistakes to Avoid When Hanging Faux Roman Shades
I’ve done this twice and learned a lot of hacks of what to and what not to do to create the perfect faux roman shades. After hanging them the first time, I eventually took them down thinking I wanted to find stark white roman shades. First, I looked at buying some legit roman shades, and got sticker shock!
Back to the DIY drawing board- then I made a roman shade valance with some thin white fabric… It was a no-go! It looked flat and dull with zero shape to it. I learned you want a thicker fabric that holds its shape better like canvas or drop cloth. So, back to my drop cloth- I bleached them and they did lighten a bit. From there I worked on mastering the art of hanging of them. Here is what I learned along the way..
How to Avoid Roman Shades with Jagged Sides
Don’t make the same mistake I did here. I did not take the time to mark a straight, level vertical line down from the edge of the Moulding that the fabric is attached to. I thought I could eyeball where to put the tack nails into the wall. Nope!
After using a level, the edges were perfectly straight and uniform. You will have a crisp, clean edge. These details make the difference. Of either looking like a sloppy DIY or like an authentic, high-end window covering.
Mistake to Avoid When Hanging Roman Shades over Blinds
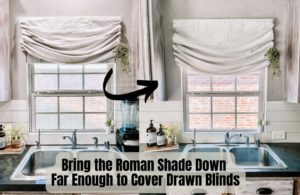
Hanging Faux Roman Shades over blinds is quite popular. Because, Faux Roman Shades are especially perfect when you don’t need the function of a movable shade. The functioning blinds will give you the privacy when you want it, and the faux roman shade add the elegance. For the best, most polished look- You will want your Roman Shades to come down low enough to cover your blinds when they are drawn. If it doesn’t come down far enough and your blinds peek out, just take your tacks out and reposition them a little lower. You may even want to begin with the bottom tack.
Trick of the Trade for Uniform Pleats
I discovered how much smoother it is to pleat & hang the sides of the faux roman shades when all the tacks are already in the fabric. I was redoing the sides of the faux roman shade over the sink (after eyeballing the straight vertical line) and all the nails were already in the hanging fabric and ready to go. It is easier because you can have them all spaced out equally and all coming straight down from the edge of the moulding on the fabric… about 2 inches in from the edge. The Faux Roman Shades looks more uniform after hanging with this method.
Don’t be Afraid of Nail Holes
If you have to reposition your nails, a couple of times and underneath your faux roman shades there is a bunch of nail holes.. Do not fret. If you can take on this project, you will have zero trouble filling in the nail holes with some putty on the end of your finger when/if the time comes to take them down.
Start with Faux Roman Shades in the Kitchen
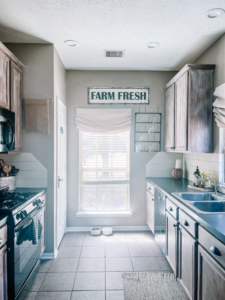
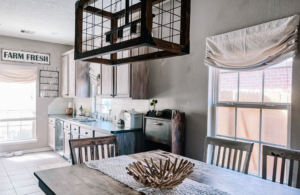
Where do I start? The kitchen is an especially popular room for Faux Roman Shades. They look and stay clean while adding a warm, homey feel. Now that you know how easy and quick it is to get the allure of the clean look of Roman Shades in your kitchen- time to grab those drop cloths and get to it!
For more Kitchen Projects check out How to Set Up your own Jaw-Dropping Pantry Organization


















Leave a Reply